First Step: Selecting the Right Heater for Your Application
Heater Length Calculator
Start from the groove: its profile and total path length set the heater diameter and length, and the wattage follows from the heated length and the voltage available at the machine. The Nextflex calculator works through those inputs and returns the matching stock or build part number.
Table 1 – Expansion Factors Chart
| Diameter | R 10 | R 12.5 | R 15 | > R 15 |
|---|---|---|---|---|
| 6.5 mm | 0.83 | 0.85 | 0.88 | 0.92 |
| 8.0 mm | 0.92 | 0.93 | 0.94 | 0.96 |
| 8.5 mm | 0.94 | 0.95 | 0.95 | 0.96 |
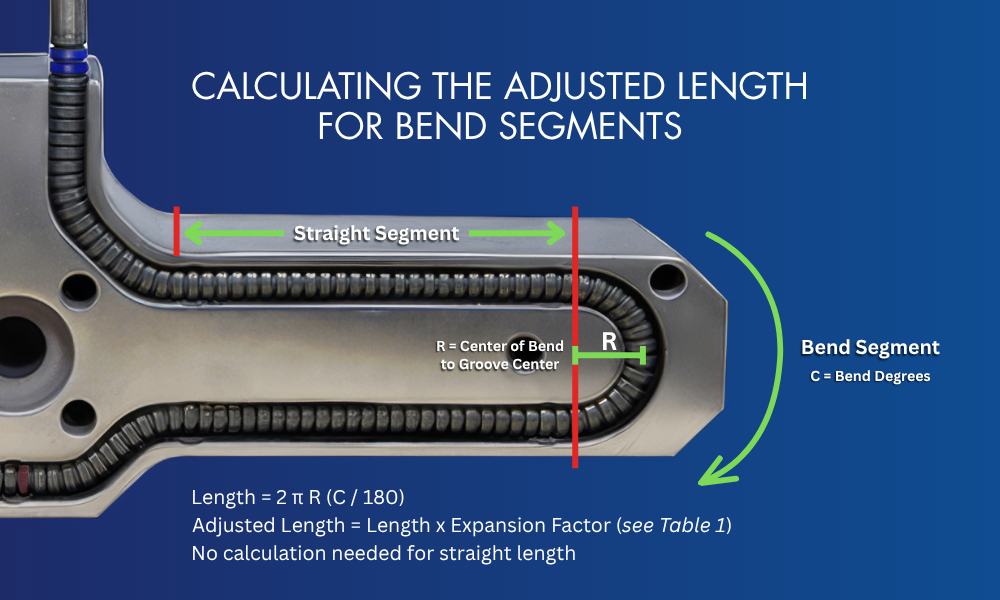
03Segments
Starting at the center of the groove, bend the Nextflex custom flexible heater at the center mark consistent with the direction of the groove.
Form and install in short lengths to prevent re-bending. Always start by installing the heater at the center mark at the center location of the groove.
It is important to make sure the Nextflex custom flexible heater is directly above the groove prior to striking. Form and install in 1-to-2-inch sections (25 to 50 mm).
While keeping the Nextflex heater flat and forming it with your free hand, bend the heater to match the groove.
One strong strike is more effective than two soft strikes. If your groove dimensions are correct, you will not damage the internal heater.
For optimal heat transfer and heater longevity, use the Nextflex staking tool to firmly secure the heater every 3/4 inch (≈ 20 mm).